Crafting Your Own Cookie Stamps: A Personalized Touch to Baking
In the world of baking, few things can elevate a simple batch of cookies like a unique imprint or design. Enter the DIY cookie stamp—an innovative way to combine creativity with culinary delight. Whether you’re looking to impress at a bake sale, add charm to your holiday treats, or infuse your baked goods with a personal touch, crafting your own cookie stamp is not only satisfying but also a wonderful way to express your individuality. In this article, we’ll explore the art of cookie stamping, providing you with ideas, tips, and step-by-step guidance to turn your imaginative designs into delightful, tasty masterpieces. Let’s embark on this doughy adventure and discover how you can transform ordinary cookies into extraordinary delights that tell your story, one stamp at a time.
Table of Contents
- Crafting Your Unique Cookie Stamp: Materials and Tools to Get Started
- Techniques for Designing Impressive Patterns on Your DIY Cookie Stamp
- Personalizing Your Cookies: Tips for Customizing Shapes and Imprints
- Caring for Your Cookie Stamp: Maintenance and Storage Practices for Longevity
- Q&A
- In Retrospect
Crafting Your Unique Cookie Stamp: Materials and Tools to Get Started
To embark on crafting your own cookie stamp, you’ll need a selection of materials that are both functional and fun. Here’s what you should gather:
- Food-Safe Rubber or Silicone: Ideal for creating stamped designs that can withstand the heat of baking.
- Wood or Acrylic Base: Provides a solid handle; wood gives a rustic vibe while acrylic can be customized with colors.
- X-Acto Knife or Craft Knife: Essential for carving intricate designs with precision.
- Cutting Mat: Protects your surfaces and keeps your blades sharp.
- Adhesive (Optional): Use a food-safe adhesive to attach your stamp design permanently to the base.
Once you have your materials in hand, it’s time to gather the tools that will enhance your cookie stamping experience:
- Digital Design Software: Programs like Adobe Illustrator can help create custom designs for your stamps.
- Printer: For printing designs onto paper, which can be used as a template for carving.
- Ruler and Compass: For measuring and creating uniform shapes and patterns.
- Sandpaper: Finishing touches to smooth edges on your stamp.
| Material/Tool | Purpose |
|---|---|
| Food-Safe Rubber | Stamp design creation |
| Wood Base | Stamp handle |
| X-Acto Knife | Carving details |
| Digital Software | Designing templates |
Techniques for Designing Impressive Patterns on Your DIY Cookie Stamp
Creating stunning patterns on your DIY cookie stamp can elevate your baking game and impress your guests. To start, consider using materials that lend themselves to detailed designs such as flexible silicone or food-safe plastic. These materials can capture intricate textures and motifs. When brainstorming designs, think outside the box! Try incorporating elements such as:
- Nature Motifs: Leaves, flowers, or animals
- Geometric Shapes: Circles, triangles, or hexagons
- Seasonal Themes: Snowflakes for winter or pumpkins for fall
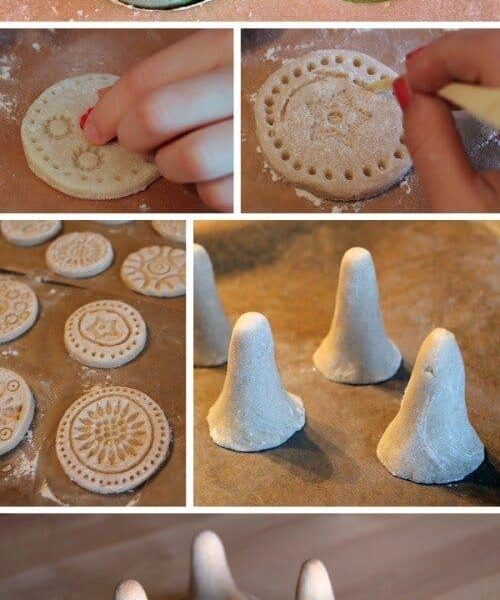
Once you have your designs in mind, it’s essential to ensure they translate well onto the cookie surface. A great technique is to create a test stamp using modeling clay before committing to the final material. This allows you to fine-tune your design and understand how it will look in dough. Additionally, consider varying the depth and size of your stamps. You can achieve a three-dimensional effect by layering multiple designs. For a clearer illustration, here’s a simple table outlining some effective techniques:
| Technique | Description |
|---|---|
| Embossing | Creating raised patterns on the cookie surface. |
| Debossing | Making indentations for a more subtle design. |
| Layering | Combining different patterns for depth. |
Personalizing Your Cookies: Tips for Customizing Shapes and Imprints
Transform your baking experience by adding a personal touch to your cookie creations. With a simple DIY cookie stamp, you can customize not just the flavor but the very shape and design of your treats. Consider using materials that allow you to easily mold and imprint designs—think silicone or wooden stamps! Some popular ideas for shapes and imprints include:
- Seasonal themes: Incorporate designs like snowflakes for winter or flowers for spring.
- Personalized messages: Stamp names, initials, or inspirational quotes directly onto the cookie surface.
- Fun shapes: Use cookie cutters to create themed sets, such as stars for Fourth of July or hearts for Valentine’s Day.
When you decide to create your own stamps, be sure to pay attention to the depth and clarity of your designs. A good imprint should be deep enough to stand out, yet not so deep that it compromises the cookie’s integrity. You can experiment with various materials for stamps, such as:
| Material | Benefits |
|---|---|
| Plastic | Durable and easy to clean |
| Wood | Natural texture, great for rustic cookies |
| Silicone | Flexible and allows for intricate designs |
Whether you decide to go for simple geometric patterns or intricate images, personalizing your cookies can turn a batch of treats into something truly special. Engage your creativity, unleash your inner baker, and impress your friends and family with beautifully imprinted cookies!
Caring for Your Cookie Stamp: Maintenance and Storage Practices for Longevity
To ensure your cookie stamp remains a beloved baking companion for years to come, it’s essential to prioritize proper maintenance. After each use, gently clean the stamp with warm, soapy water. Avoid abrasive materials that could scratch the surface; instead, opt for a soft sponge or cloth. Once cleaned, dry it thoroughly with a towel to prevent moisture damage. Regularly check for any buildup of dough residue in the stamped design, as this can affect future impressions. For stubborn bits, a toothpick can help dislodge any remaining dough without harming the stamp.
When it comes to storage, keeping your cookie stamp in a safe and dry place is vital. Here are some best practices to consider:
- Store in a cool, dry area to prevent warping.
- Place in a padded container or wrap in a soft cloth to avoid scratches.
- Avoid stacking heavy items on top to maintain its shape.
Additionally, consider creating a designated space for your cookie-making tools. This not only keeps everything organized but also protects your stamp from potential damage. You might even label a clear container or drawer so you can easily find your stamp when inspiration strikes!
Q&A
Q&A: DIY Cookie Stamps – Crafting Your Own Unique Designs
Q: What is a DIY cookie stamp, and why would I want to make one?
A: A DIY cookie stamp is a custom tool used to imprint designs or messages onto cookie dough before baking. Creating your own stamp allows you to personalize your cookies for special occasions, gifts, or just to express your creativity in the kitchen. Plus, it gives you total control over the design, so you can match any theme or flavor you desire!
Q: What materials do I need to make my own cookie stamp?
A: To create a DIY cookie stamp, you’ll need a few basic materials: a base (like a wooden block or a plastic lid), a stamp head (which can be made from rubber, silicone, or even carved from potatoes), and a hot glue gun or double-sided tape for assembly. Optional materials include paint or food-safe ink for decorating your stamp and parchment paper to test your designs.
Q: How do I create a design for my cookie stamp?
A: Begin by brainstorming ideas or sketching designs on paper. Simple shapes, letters, or even images work well for cookie stamps. Once you’ve settled on a design, you can transfer it to your stamp head material. For soft materials like potatoes or foam, carve or cut out your design. For more robust options, you can use a laser cutter or even print your design onto rubber sheets.
Q: Can I use my DIY cookie stamp on any type of cookie dough?
A: Absolutely! However, keep in mind that softer doughs may not hold the design as well as firmer ones. It’s best to use chillier doughs, like sugar cookies, gingerbread, or shortbread, which can take the pressure of the stamp without losing their shape. Before stamping, ensure the dough is slightly chilled, and if needed, dust the stamp with a little flour to prevent sticking.
Q: Are there any tips for making my cookie stamps more effective?
A: To achieve the best results, practice makes perfect! Always test your stamp on a bit of dough first. Press down firmly and evenly, but don’t press too hard to avoid flattening the cookie completely. Additionally, if your design has fine details, consider making the stamp deeper to help those details stand out after baking.
Q: How can I personalize my cookie stamps for special occasions?
A: Personalization is key! You can incorporate names, dates, or themed images (like hearts for Valentine’s Day or snowflakes for holidays) into your designs. For a more festive touch, use colored edible inks to add flair to the impressions. Your creativity is your only limit here!
Q: How do I care for and maintain my DIY cookie stamps?
A: After using your stamps, gently wash them in warm soapy water to remove any dough remnants. Avoid soaking any parts that might not be water-resistant. If using rubber or silicone, store them flat in a cool, dry place to prevent warping. Keeping them clean and well-maintained will ensure they last for many baking adventures to come.
Q: Where can I find inspiration for more designs?
A: Inspiration is everywhere! Browse online platforms like Pinterest or Instagram, check out baking blogs, or draw from nature, patterns, or even your favorite quotes. Remember, the best designs often come from personal interests or experiences, so don’t hesitate to think outside the cookie box!
With these tips and FAQs, you’re ready to embark on your DIY cookie stamp adventure. Happy stamping!
In Retrospect
As we conclude this delightful exploration of DIY cookie stamps, we hope you feel inspired to unleash your creativity in the kitchen. With just a few materials and a sprinkle of imagination, you can transform ordinary cookies into edible works of art that are perfect for any occasion. Whether you’re crafting personalized gifts or simply adding a special touch to your family gatherings, your homemade stamps will definitely impress. So gather your supplies, let your artistic spirit shine, and happy stamping! Remember, each bite of your uniquely stamped creations serves as a testament to your creativity and care—one delicious cookie at a time.


