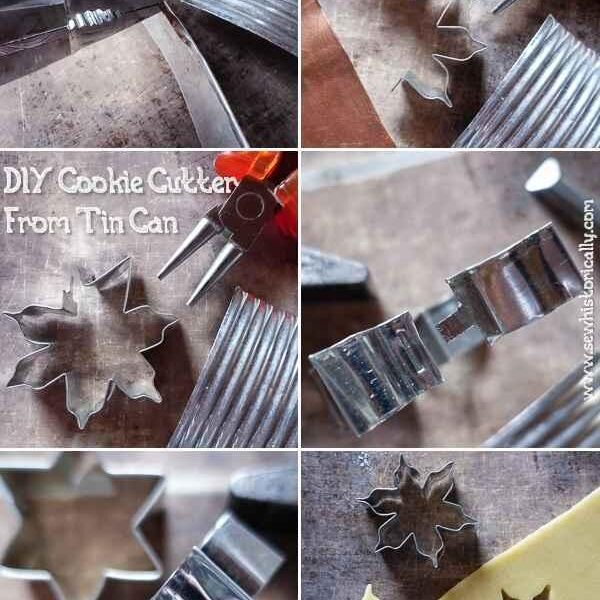
As the holiday season approaches, kitchens everywhere begin to bustle with festive cheer and the delightful aroma of baked goods. One of the most cherished traditions during this time is the art of cookie decorating—where flour, sugar, and a sprinkle of creativity come together to create delicious, festive masterpieces. While store-bought cookie cutters can often set the mood, why not elevate your culinary experience by crafting your very own DIY Christmas cookie cutters? In this article, we’ll explore the joys of making personalized cutters that not only add a unique touch to your holiday baking but also serve as a fun and engaging activity for friends and family. From simple designs to intricate shapes, get ready to unleash your creativity and make this Christmas a little sweeter—one cookie at a time!
Table of Contents
- Crafting Unique Shapes: Exploring Materials for Homemade Cookie Cutters
- Techniques for Precision: Tips on Designing and Cutting Your Own Cookie Cutters
- Personalized Gifts: How to Make Custom Cookie Cutters for Family and Friends
- Baking with Flair: Decorating Ideas to Elevate Your Cookie Creations
- Q&A
- Insights and Conclusions
Crafting Unique Shapes: Exploring Materials for Homemade Cookie Cutters
Creating your own cookie cutters opens up a world of possibilities, especially during the festive season. With a little imagination and the right materials, you can craft shapes that reflect your holiday spirit. Here are some materials to consider for your DIY cookie cutters:
- Aluminum sheets: Lightweight and easy to shape, aluminum can be cut into intricate designs with minimal effort.
- Plastic containers: Old food containers can be repurposed; they’re durable and come in various thicknesses, making them ideal for simple shapes.
- Cardboard: Perfect for temporary cookie cutter designs; just be sure to cover it in foil or wax paper to prevent it from absorbing flour!
- 3D printed designs: If you have access to a 3D printer, you can create custom shapes tailored exactly to your holiday wishes.
When selecting your material, consider the following factors:
| Material | Durability | Ease of Use |
|---|---|---|
| Aluminum sheets | High | Moderate |
| Plastic containers | Moderate | Easy |
| Cardboard | Low | Easy |
| 3D printed | High | Moderate |
Combining these materials with creativity can result in personalized cookie cutters that add a special touch to your holiday baking. Each shape can tell a story or represent a cherished memory, turning your cookie making into a delightful ritual!
Techniques for Precision: Tips on Designing and Cutting Your Own Cookie Cutters
Creating your own cookie cutters can be an enjoyable and rewarding experience, especially during the holiday season. To achieve precision in your designs and cuts, consider using the right materials. Food-safe plastic sheets are ideal for creating sturdy, reusable cutters. Alternatively, for a temporary solution, aluminum foil can be molded easily into various shapes. When sketching your designs, stick to simple outlines that capture the essence of your desired shapes—think of classic Christmas icons like stars, trees, and gingerbread men. To ensure an even cut, use a sharp utility knife or scissors when cutting your final shape from the material you’ve chosen.
Once your cookie cutter shape is ready, enhancing its functionality and aesthetics is key. Consider the following tips:
- Edge Design: Round the edges to prevent sharp cuts that might damage your cookie dough.
- Thickness Matters: A thickness of about 1/4 inch works best for durability while maintaining ease of use.
- Customization: Use stamped designs or texture rollers to add festive patterns to your cutters.
it’s advisable to test your cookie cutter with some scrap dough before your grand baking session. This allows you to assess its performance and make necessary adjustments. Enjoy the creative process and watch your kitchen transform into a bustling holiday workshop!
Personalized Gifts: How to Make Custom Cookie Cutters for Family and Friends
Creating personalized cookie cutters is a delightful way to add a touch of custom magic to your holiday baking. Grab some food-safe materials, such as plastic sheets or metal strips, and a pair of scissors or a craft knife. For a basic shape, consider traditional options like stars, hearts, or Christmas trees, but let your imagination run wild by crafting unique shapes that represent loved ones’ hobbies or interests! You can even incorporate initials or family monograms into your designs. Be sure to smooth out any sharp edges to ensure safe handling during cookie-making.
Once you’ve designed your custom cookie cutters, the fun doesn’t stop there. Personalize the cookies further by icing them with colors and designs that reflect the recipient’s style. A great idea is to create a cookie gift basket featuring various shapes, decorated cookies, and a few of your homemade creations. Consider these tips for an unforgettable presentation:
- Choose a cohesive color theme: Match the icing colors with the holiday season or the recipient’s preferences.
- Add decorative tags: Write a personalized message to make each gift feel special.
- Use creative packaging: Opt for clear cellophane bags tied with festive ribbons.
Baking with Flair: Decorating Ideas to Elevate Your Cookie Creations
Q&A
Q&A on DIY Christmas Cookie Cutters
Q: What are DIY Christmas cookie cutters?
A: DIY Christmas cookie cutters are custom-made tools that you can craft at home to shape cookie dough into festive designs. This can include stars, trees, snowmen, and other holiday-themed shapes, allowing for a personal touch in your holiday baking.
Q: What materials do I need to make my own cookie cutters?
A: Common materials for creating DIY cookie cutters include aluminum sheets, craft plastic, or even sturdy cardboard. You’ll also need scissors or metal snips, a ruler, a marker, and optionally, metal tape or glue to keep pieces together.
Q: Is it difficult to make my own cookie cutters?
A: Not really! Making your own cookie cutters can be a fun and simple project. While it requires some precision in cutting, basic shapes are straightforward to create. Just follow simple designs, and with a little patience, you’ll have unique cookie cutters in no time.
Q: Can I use 3D printing to make cookie cutters?
A: Absolutely! If you have access to a 3D printer, you can design cookie cutters using software like Tinkercad or Fusion 360. There are many templates available online, or you can create your own unique shapes to match your festive theme.
Q: Are there any safety considerations?
A: Yes, if you’re using sharp tools for cutting materials like metal or plastic, be cautious to avoid injury. Ensure you have a clean workspace and consider adult supervision for younger crafters. If you’re using a 3D printer, follow all safety guidelines for operating the machine.
Q: Can I decorate the cookies after I bake them?
A: Definitely! Once you’ve used your DIY Christmas cookie cutters to shape and bake your cookies, the fun continues with decorating. Use icing, edible glitter, sprinkles, and other embellishments to create festive faces and designs that match the holiday spirit.
Q: How can I ensure my DIY cookie cutters last for future baking sessions?
A: To ensure longevity, keep your homemade cookie cutters clean and dry after each use. Store them in a cool, dry place, and avoid bending or stressing their shapes. If you’re using cardboard, consider sealing them with a clear protective coating to extend their life.
Q: What are some unique shapes I can create for my Christmas cookies?
A: Let your imagination run wild! Beyond classic shapes like stars and trees, think of creating ornaments, candy canes, gingerbread houses, or even your favorite winter animals. Personal touches like initials or family traditions can also make for memorable cookie designs.
Q: Can this be a family activity?
A: Absolutely! Making DIY cookie cutters can be a delightful family event. Gather the kids for an afternoon of creativity, letting each family member design their own cookie cutter. Once everyone has contributed, you can all bake and decorate together for some good old-fashioned holiday cheer.
Q: Any final tips for beginners?
A: Start small! Focus on creating just a few shapes before expanding your collection. Choose simple designs, and don’t be afraid of experimentation. The goal is to enjoy the process and add a sprinkle of personal flair to your holiday treats! Happy crafting!
Insights and Conclusions
As we embrace the spirit of the season, there’s something truly magical about crafting your own DIY Christmas cookie cutters. This hands-on project not only allows you to personalize your holiday baking but also creates lasting memories with family and friends. Whether you’re shaping whimsical holiday characters or classic festive symbols, each cookie cutter tells a story of creativity and joy. So gather your materials, unleash your imagination, and take a moment to enjoy the process. This holiday season, let your kitchen become a canvas, and may every cookie you bake bring warmth to your home and happiness to your hearts. Happy crafting and even happier baking!


