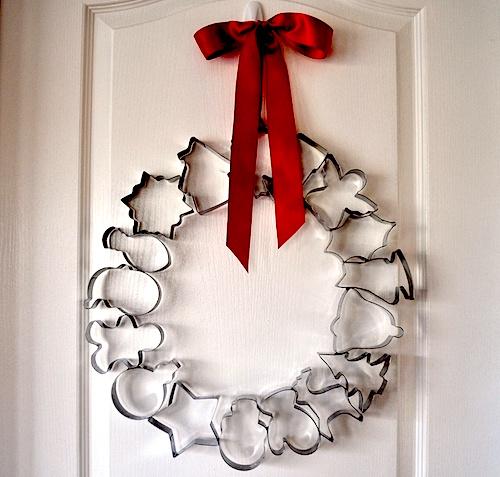
In a world where individuality is celebrated, the “cookie cutter wreath” emerges as a delightful paradox—a charming blend of uniformity and creativity. While the term might conjure images of mass production and sameness, these whimsical adornments are anything but ordinary. Designed to evoke the warmth of tradition while inviting a fresh twist, cookie cutter wreaths offer a unique way to embellish your home, infusing it with seasonal cheer and a touch of personality. Whether you’re a crafting novice or an experienced artisan, exploring the art of cookie cutter wreath-making promises a journey of discovery, where familiar shapes take on new life. Join us as we delve into the origins, techniques, and vibrant inspirations behind this enchanting craft, and learn how to transform simple materials into a stunning display that welcomes all who enter your door.
Table of Contents
- Exploring the Art of Cookie Cutter Wreaths: A Creative Canvas for Seasonal Decor
- Choosing the Right Cookie Cutters: Tips for Shape Selection and Design Cohesion
- Crafting Techniques and Materials: Building Beautiful Wreaths with Ease
- Personalizing Your Cookie Cutter Wreath: Adding Unique Touches for Every Occasion
- Q&A
- Future Outlook
Exploring the Art of Cookie Cutter Wreaths: A Creative Canvas for Seasonal Decor
The beauty of cookie cutter wreaths lies in their versatility and charm, making them an exceptional choice for seasonal decor. By transforming ordinary baking tools into stunning decorative pieces, enthusiasts can craft unique designs that reflect personal style and seasonal themes. To start this delightful project, gather an assortment of cookie cutters in various shapes and sizes; stars, hearts, and holiday-themed motifs add a whimsical touch. Other materials to consider include a sturdy wreath form, colorful ribbons, and durable adhesive to secure your cookie cutters in place. You can also incorporate natural elements such as evergreen sprigs or dried flowers for an organic feel that harmonizes with the colored metal or plastic of the cookie cutters.
As you arrange your cookie cutters, think about the color palette that best captures the essence of the season. For instance, warm tones and rustic herbs are perfect for autumn, while vibrant reds and greens bring the spirit of the holidays to life. Consider using a hot glue gun for secure, long-lasting adherence and layering smaller cutters over larger ones to create depth and visual interest in your wreath. Don’t forget to embellish with additional accents such as burlap, twine, or shimmering ornaments that can pair beautifully with your cookie cutter designs. The result is a captivating wreath that invites warmth and creativity into your home, showcasing the charm of custom-made seasonal decor.
Choosing the Right Cookie Cutters: Tips for Shape Selection and Design Cohesion
When crafting an eye-catching cookie cutter wreath, the shapes you select are pivotal in creating a cohesive design. Consider choosing a mix of holiday-themed cutters such as snowflakes, stars, and gingerbread men for a festive vibe. To enhance visual appeal, think about incorporating non-holiday shapes like hearts or flowers that can provide contrast and depth. The key is to aim for a balanced arrangement that allows each shape to complement the others, avoiding any overpowering presence from one particular design. A harmonious blend of sizes can add an intriguing layer to your wreath, so play with both large and petite molds.
To further ensure design cohesion, focus on a unifying color palette or icing technique. Ensure that every cookie cutter shape is either decorated with similar colors or uses the same icing style, whether that’s smooth royal icing or textured buttercream. When laying out the cookies for your wreath, think about using a rotating color scheme: for example, alternate between light and dark shades or use a gradient effect that leads the eye around the wreath. Here’s a simple table to help visualize complementary shapes and suggested colors:
| Shape | Color Suggestion |
|---|---|
| Snowflake | Light Blue |
| Star | Gold |
| Gingerbread Man | Brown |
| Heart | Red |
| Flower | Pink |
Crafting Techniques and Materials: Building Beautiful Wreaths with Ease
Creating a stunning cookie cutter wreath is as delightful as it sounds. Begin with an assortment of your favorite cookie cutters—think shapes like stars, hearts, and seasonal motifs. Gather these materials:
- Thin wire or wreath frame: This will serve as the base.
- Decorative ribbon: Use it for ties or to hang your wreath.
- Paint and embellishments: Add flair with sprays, glitter, or small ornaments.
- Seasonal foliage: Consider faux pine, eucalyptus, or dried flowers for a natural touch.
Once you have your materials, it’s time to begin assembly. Secure your cookie cutters onto the wire frame using the thin wire; aim for a balanced arrangement. For added charm, thread the decorative ribbon through the top of the wreath for hanging. infuse color and sparkle by painting the cookie cutters or adding embellishments around them. Here’s a simple table to help visualize the process:
| Step | Description |
|---|---|
| Preparation | Gather all materials and select cookie cutter shapes. |
| Arrangement | Attach cookie cutters to the frame, evenly spacing them out. |
| Finishing Touches | Add ribbon, paint, and any additional decorations. |
Personalizing Your Cookie Cutter Wreath: Adding Unique Touches for Every Occasion
Q&A
Q&A: All About Cookie Cutter Wreaths
Q: What is a cookie cutter wreath?
A: A cookie cutter wreath is a charming decorative piece crafted from holiday-themed cookie cutters. These whimsical creations combine the joy of baking with festive decor, making them an engaging project for crafters of all ages.
Q: How do I make a cookie cutter wreath?
A: Making a cookie cutter wreath is a delightful process! Start by gathering your cookie cutters, a sturdy base like a foam or wire wreath form, and materials such as ribbon, twine, or even faux greenery. Simply attach the cookie cutters to the base using hot glue, arranging them in a visually appealing manner. Feel free to embellish with additional decorations like ornaments or dried fruit slices!
Q: What materials do I need?
A: Essential materials include cookie cutters, a wreath form, glue, and embellishments. You might also want decorative ribbons, greenery, or seasonal accents that reflect your personal style and the theme of the wreath.
Q: Can cookie cutter wreaths be made for different seasons or occasions?
A: Absolutely! Cookie cutter wreaths can be tailored for any season or special event. For example, use heart-shaped cutters for Valentine’s Day, pumpkins for fall, or snowflakes for winter. The versatility of cookie cutters makes this project suitable for year-round decoration.
Q: Are cookie cutter wreaths suitable for beginners?
A: Yes! Cookie cutter wreaths are perfect for beginners as they require minimal crafting skills and can be customized to fit your level of experience. Plus, the creative freedom involved means you can make something truly unique with each project.
Q: How can I enhance my cookie cutter wreath once I’ve finished?
A: Once your wreath is complete, consider adding a bow made from colorful ribbons for an extra pop! Seasonal embellishments like pinecones for winter or flowers for spring can also bring additional charm. Hanging it against a contrasting wall will make it stand out beautifully.
Q: Are cookie cutter wreaths a good gift idea?
A: Certainly! A handmade cookie cutter wreath can be a thoughtful and personal gift. Not only does it demonstrate effort and creativity, but it can also connect the recipient to nostalgic memories of baking and the warmth of home.
Q: Where can I display my cookie cutter wreath?
A: Display your cookie cutter wreath on your front door, over a mantel, or on a wall in your home. It can also serve as a centerpiece on a festive table setting. Just ensure it’s visible enough to share the joy of your creation!
Q: Can I use metal cookie cutters?
A: Yes! Metal cookie cutters can add a rustic touch to your wreath. Just be mindful of their sharp edges when handling them. They can also create interesting shadows and textures when displayed in light.
Q: What’s the most important tip for creating a successful cookie cutter wreath?
A: The key is to play with colors and shapes! Don’t be afraid to experiment—mix different sizes and styles of cookie cutters to add dimension and interest. Enjoy the process, and let your creativity shine!
Future Outlook
As we wrap up our exploration of the charming world of cookie cutter wreaths, it becomes clear that these delightful creations are more than just festive decorations; they embody a unique blend of nostalgia and creativity. Whether you choose to craft a whimsical wreath for the holiday season or a year-round display that reflects your personal style, the joy of creating with cookie cutters transcends the simple act of decorating. With a few basic supplies and a dash of imagination, you can transform everyday items into eye-catching art that brings warmth and cheer to your home. So, unleash your inner artist, gather your favorite cookie cutters, and start crafting your own cookie cutter wreath—your door will thank you for it! Happy decorating!


